Typing simple structured documents
|
|
Chapter II.1 Typing simple structured documents |
|
A main advantage of using TeXmacs as a text editor is that it helps and encourages you to write so called structured documents. Let us briefly explain what we mean by this. If you look at a printed book, then you will notice that it has been subdivided into chapters, a table of contents, an index and so on. The start of a chapter is usually indicated by a page break and a title in a clearly distinguishable font. Moreover, the title of the chapter is often used as a header for all pages in that chapter. Inside a chapter, there may be other special pieces of text, like citations, definitions, theorems, etc. which are typeset in a different way from the main text.
Two approaches can be distinguished in order to write a book or a shorter document with the above features. The first, so called visual approach consists of taking care of all typesetting issues yourself. This means that you will have to choose the appropriate character font each time that you start a new chapter or theorem and that you have to number these chapters and theorems yourself. The second structured document approach requires you to tell the computer when you want to start a new chapter or theorem. The document style is responsible for choosing a nice way to typeset chapter titles, theorems, etc.
The advantage of a purely visual approach is that it may seem a bit simpler and natural for a newcomer, because it involves only little operations (such as changing the font size, selecting a bold or italic font, etc.). Moreover, most commercial text editors encourage you to use it. However, the visual approach has many disadvantages with respect to the structured document approach:
The visual approach is not flexible. Imagine for instance that you started to write a document in which the titles of the chapters use a 14 points bold font. If you change your mind somewhere in the middle and prefer a 15 points font instead, then you have to modify the titles of all chapters. Similarly, if you start a new chapter in between two others, then you have to renumber all chapters yourself.
The visual approach lacks semantics. When starting a new chapter using the structured document approach, you give the computer extra information about the titles and locations of the chapters in your book. This information may for instance be used for the automatic generation of tables of contents or for the creation of headers. Actually, this information may even be used for purposes that you may not yet be aware of. For instance, one may imagine editing facilities for jumping from one section to the next or the previous one.
The visual approach needs more expertise. Indeed, a professional bookprinter has learned a lot about how to typeset a book in a very attractive way. The actual layout of the book and the fonts which have been used are the result of careful thought. A typical user does not have the required expertise for this job. Usually, he will therefore obtain a better result by using a predefined document style.
For the above reasons TeXmacs encourages you to use the structured document approach, although we still support the visual approach. Indeed, the visual approach may sometimes be handy for certain exceptional situations. Below, we will give some very simple examples of both approaches.
After giving a name to your document, the next thing you usually should
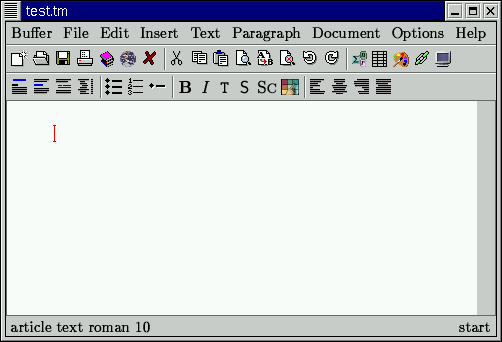
do is selecting a document style in
 or Document->Style. The left footer indicates
the current document style. For instance, you would obtain
a window as below after selection of the article style:
or Document->Style. The left footer indicates
the current document style. For instance, you would obtain
a window as below after selection of the article style:
The following styles are standard:
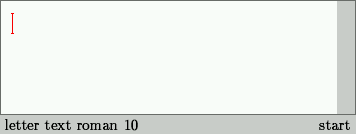
Depending on the document style, a text is usually subdivided into chapters
(in the case of a book or a thesis) or into sections (in the case of
articles, letters, etc.). In order to start a new section,
you should press
 ->Section
or Text->Section. Alternatively, you may type \section
followed by return. When starting with an empty document,
you should observe the following change on your screen:
->Section
or Text->Section. Alternatively, you may type \section
followed by return. When starting with an empty document,
you should observe the following change on your screen:
|
|
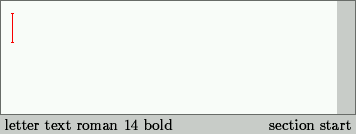
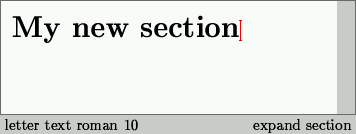
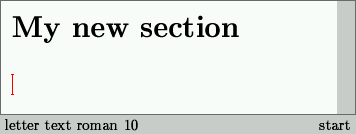
Notice the change of the size of the cursor. The left footer shows that the section title will appear in 14 points bold face font. The right footer indicates that you are at the start of typing the title of a section. When you have typed the section title, move the cursor to the right to get out of the 'section title' structure (and return to the normal text):
|
|
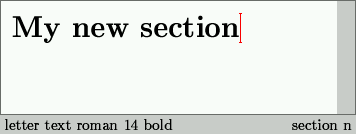
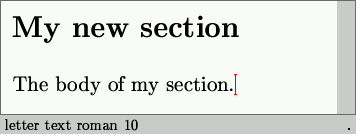
Observe that the left footer indicates that you are again using the usual 10 points computer modern roman font. The right footer indicates that your cursor is after the section title (after the expansion of the section macro). In order to continue typing, you should first go to the next line by pushing the return or enter key. Next you may type the body of your section.
|
|
At this point it is interesting to change a posteriori your document style, in order to get a small taste of the power of structured documents. After selection of the article document style, the sections will be numbered:

Often, one needs to single out portions of text,
which are special in certain respects,
like important passages or names.
For instance, in order to emphasize a piece of text,
you may either press
 ,
use the keyboard shorthand E-s e,
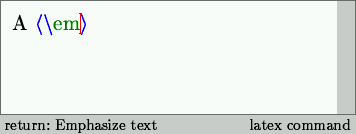
or type \em followed by return.
Below we used the last technique:
,
use the keyboard shorthand E-s e,
or type \em followed by return.
Below we used the last technique:
|
|
|
|
|
|
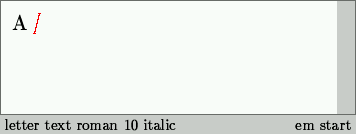
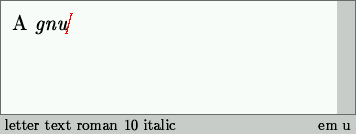
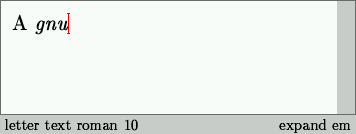
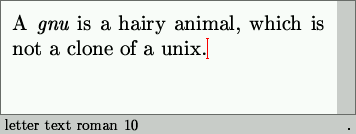
The first image indicates the state of the editor after typing \em. The footer indicates that \em is recognized as a LaTeX command and that you may start emphasizing text by pressing return. The second image shows what happens if you do so: the left footer indicates that we are now using an italic font and the right footer indicates that we are inside the emphasize environment. After typing the emphasized text (third image), we have to press the right cursor key (fourth image) to tell the editor that we are done and want to continue typing normal text (last image).
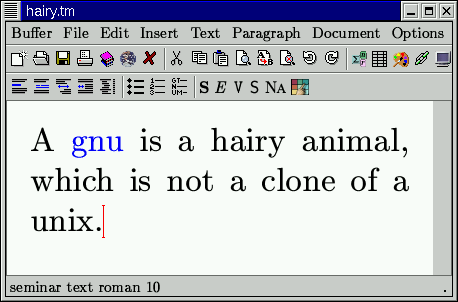
From the visual point of view, the same effect could have been achieved by typing the word gnu in an italic font using Format->Shape->Italic. However, this would have given less structure to the text, since we did not specify the intended signification of the italic piece of text. This is a disadvantage when reusing the text for another purpose, such as a producing a slide or making the text available for blind people. Indeed, on a slide, emphasized text might be rendered in a different colour instead of an italic font shape:
|
|
|
Copyright (C) 1999, 2000 by Joris van der Hoeven.
This webpage is part of GNU TeXmacs and the larger GNU project. Verbatim copying and distribution of it is permitted in any medium, provided this notice is preserved. For more information or questions, please contact Joris van der Hoeven.
Free Software Foundation, Inc., 59 Temple Place - Suite 330, Boston, MA 02111, USA