 TeXmacs style files
One of the fundamental strengths of TeXmacs is the possibility to write your own style files and packages. The purpose of style files is multiple:
-
They allow the abstraction of repetitive elements in texts, like sections, theorems, enumerations, etc.
-
They form a mechanism which allow you to structure your text. For instance, you may indicate that a given portion of your text is an abbreviation, a quotation or “important”.
-
Standard document styles enable you to write professionally looking documents, because the corresponding style files have been written with a lot of care by people who know a lot about typography and aesthetics.
The user may select a major style from the
Style packages, which are selected from the
When you want to add your own markup to TeXmacs or personalize the layout, then you have to choose between writing a principal style file or a style package. In most cases, you will probably prefer to write a style package, since this will allow you to combine it arbitrary other styles. However, in some cases you may prefer to create a new principal style, usually by personalizing an existing style. This is usually the case if you want to mimic the layout policy of some journal. In this chapter, we will both explain how to write your own style packages and how to customize the standard styles.
1.Writing a simple style package
Let us explain on an example how to write a simple style package.
First of all, you have to create a new buffer using
$HOME/.TeXmacs/packages
Notice that the button
$HOME/.TeXmacs/texts
Consequently, you can go to the style package directory from there, by double clicking on .. and next on packages. Similarly, the directory
$HOME/.TeXmacs/styles
contains your personal style files. After saving your empty style
package, it should automatically appear in the
Let us now create a simple macro
<assign||>
Now enter “hi” as the first argument and type Alt+Ctrl+M inside the second argument in order to create a macro. You should now see something like
<assign|hi|<macro|>>
Finally, type the text “Hello world” in the body of the macro. Your document should now consist of the following line:
<assign|hi|<macro|Hello world>>
After saving your style package, opening a new document and selecting
your package in the
In a similar way, you may create macros with arguments. For instance,
assume that we started entering a macro  inside the macro body so as to create an additional
argument on the left hand side of the cursor. We next enter the name
of the argument, say “name”. You should now see something
like below:
inside the macro body so as to create an additional
argument on the left hand side of the cursor. We next enter the name
of the argument, say “name”. You should now see something
like below:
<assign|hello|<macro|name|>>
In the second argument of the body, we now type “Hello ”,
Alt+Ctrl+#, “name”,  and “, how are you today?”. After this you
should see
and “, how are you today?”. After this you
should see
<assign|hello|<macro|name|Hello name, how are you today?>>
The Alt+Ctrl+# shortcut is used to retrieve the
macro argument name. Instead of typing
Alt+Ctrl+#, “name” and , you may also use the hybrid \-key
and type \NAME followed by Return.
After saving your style package, you may again use the macro in any
document which uses your package by typing \HELLO and hitting Return.
From the internal point of view, all macro definitions are stored in
the environment of the TeXmacs typesetter. Besides macros, the
environment also contains normal environment variables, such as
section counters or the font size. The environment variables can
either be globally changed using the
<assign|section-nr|-1>
in your package, and using article
as your major style, then the first section will be numbered  . Similarly, the variant
<assign|hello|<macro|name|Hello <with|font-shape|small-caps|name>!>>
of the
<assign|hello|<macro|name|Hello <person|name>!>>
In order to produce the macro application <person|name>, you first have to start a compound tag using Alt+Ctrl+C, type the name “person”, insert
an argument Meta+,
and enter the argument name as before. When
you are done, you may press Return in order to
change the and “name”.
By combining the above constructs, an ordinary user should already be able to produce style packages for all frequently used notations. An interesting technique for writing macros which involve complex formulas with some subformulas which may change goes as follows:
-
Type the formula, say
 , in an ordinary
document.
, in an ordinary
document.
-
Create the skeleton of your macro in your style package:
<assign|n-tuple|<macro|a|>>
-
Copy the formula and paste it into the body of your macro:
<assign|n-tuple|<macro|a|(a<rsub|1>,…,a<rsub|n>)>>
-
Replace the subformulas you want to parameterize by macro arguments:
<assign|n-tuple|<macro|a|(a<rsub|1>,…,a<rsub|n>)>>
-
You may now use the macro in documents which use your package:

2.Rendering of style files and packages
2.1.ASCII-based or tree-based editing: an intricate choice
Most users are used to edit source code using a conventional editor
like
In TeXmacs we have chosen to implement the second option. More
precisely, any document can be edited in “source mode”,
which is merely a mode for rendering the document in a way which makes
its tree structure particularly apparent. It may be instructive to
take an arbitrary document of yours and to take a look at it in
“source mode” by enabling
The choice between ASCII-based editing and tree-based editing is non-trivial, because TeXmacs style files and packages have a double nature: they may be seen as programs which specify how to render macros, but these programs naturally contain ordinary content. There are several reasons why users often prefer to edit source code in an ASCII-based format:
-
It is easy to manually format the code so as to make it more readable.
-
In particular, it is easy to add comments.
-
Standard editors like
Emacs provide tools for automatic highlighting, indentation, etc. -
One is not constraint by any “structure” during the editing phase.
Our approach is to reproduce as much of the above advantages in a structured document environment. Although point ? will obviously be hard to meet when following this approach, we believe that the first three advantages might actually become greater in a structured environment. However, this requires a more profound understanding of how users format and edit source code.
For instance, consider a piece of manually formatted code like
if (cond) hop   = 2;
else      holala= 3;
Clearly, the user had a particular formatting policy when writing this code. However, this policy does not appear in the document: manual intervention will be necessary if the variable cond is renamed c, or if the variable holala is renamed hola.
At the moment, TeXmacs provides no tools for dealing with the above example in an automatic way, but a few tools are already provided. For instance, the user is given a great amount of control on how to indent source code and reasonable defaults are provided as a function of the structure. We also provide high level environments for comments and structured highlighting. Further tools will be developed later and we are open for any suggestions from our users.
2.2.Global presentation
In the
First of all, you may choose between the different major styles “angular”, “scheme”, “functional” and “LaTeX” for rendering source trees, as illustrated in the figure below:
|
|||||||||||||||
Secondly, you may wish to reserve a special treatment to certain tags
like
- None
-
No tags receive a special treatment.
- Formatting
-
Only the formatting tags
concat anddocument are represented as usual. - Normal
-
In addition to the formatting tags, a few other tags like
compound ,value andarg are represented in a special way. - Maximal
-
At the moment, this option is not yet implemented. The intention is to allow the user to write his own customizations and to allow for special rendering of basic operations like
plus .
These different options are illustrated below:
|
|||||||||||||||
Another thing which may be controlled by the user is whether the
presentation of tags should be compact or stretched out across several
lines. Several levels of compactification may be specified in the
- Minimal
-
The tags are all stretched out across several lines.
- Only inline tags
-
All non-inline tags are stretched out across several lines.
- Normal
-
All inline arguments at the start of the tag are represented in a compact way. As soon as we encounter a block argument, the remainder of the arguments are stretched out across several lines.
- Inline arguments
-
All inline arguments are represented in a compact way and only block tags are stretched out across several lines.
- Maximal
-
All source code is represented in a compact way.
The “normal” and “inline arguments” options rarely differ. The visual effect of the different options is illustrated below:
|
|||||||||||||||
Finally, the user may specify the way closing tags should be rendered when the tag is stretched out across several lines. The rendering may either be minimalistic, compact, long, or recall the matching opening tag. The different options are illustrated below:
|
|||||||||||||||
2.3.Local customization
Even though TeXmacs tries hard to render source code in a nice way
following the global rendering options that you specified, the
readability of the source code often needs to be further enhanced
locally. In source mode, this can be done using the menus
First of all, for certain pieces of content the user may prefer to see them in their “activated” form instead as dead source code. This may for instance be the case for embedded images, or for mathematical symbols, like in

Such an active presentation may also be preferred for certain more complex macros:

A piece of code can be activated by selecting it and using
Another way to customize the rendering is to override some of the
global rendering options. This is mainly interesting for controlling
more precisely which tags have to be stretched across several lines
and which tags have to be represented in a compact fashion. For
instance, the
<assign|my-section|
<macro|title|<\concat|
<header-hook|title>
|
<toc-hook|title>
|
<my-section-title|title>
>
>>
we have stretched the
<assign|my-section|
<macro|title|<\concat|
<header-hook|title>
|
<toc-hook|title>
|
<with|font-series|bold|Section:> title
>
>>
At present, we did not implement a way to mark arguments as inline or block, but we might do this later.
A final way to customize the rendering of source code is to apply an
arbitrary macro using
3.The style-sheet language
In the section about writing a simple style package we already gave you a first impression about the style-sheet language of TeXmacs. In this section, we will give a more complete survey of the available features. For more detailed descriptions, we refer to the chapter about the TeXmacs primitives.
The style-sheet primitives can be obtained from the and Meta+
keys are used for inserting arguments.
3.1.Assignments
All user defined TeXmacs macros and style variables are stored in the
“current typesetting environment”. This environment
associates a tree value to each string variable. Variables whose
values are macros correspond to new primitives. The others are
ordinary environment variables. The primitives for operating on the
environment are available from
You may permanently change the value of an environment variable using
the
<assign|hi|<macro|Hi there!>>
You may also locally change the values of one or several environment
variables using the
<with|font-series|bold|color|red|Bold red text>
The value of an environment variable may be retrieved using the
<assign|my-counter|<plus|my-counter|1>>
Finally, you may associate logical properties to environment variables
using the
3.2.Macro expansion
The main interest of the TeXmacs' style-sheet language is the
possibility to define macros. These come in three flavours: ordinary
macros, macros which take an arbitrary number of arguments and
external macros, whose expansion is computed by
Ordinary macros are usually defined using
<assign|my-macro|<macro|x1| |xn|body>>
After such an assignment,  arguments, which
may be called using
arguments, which
may be called using
<my-macro|y1||yn>
Inside the body of the macro, the
<assign|hello|<macro|name|Hello name, you look nice today!>>
It is possible to call a macro with less or more arguments than the
expected number. Superfluous arguments are simply ignored. Missing
arguments take the nullary
<assign|hey|
<macro|first|second|<\if|
<equal|second|?>
|
Hey first, you look lonely today…
|
Hey first and second, you form a nice couple!
>
>>
We finally notice that you are allowed to compute with macros, in a similar way as in functional programming, except that our macros are not closures (yet). For instance:
<assign|my-macro-copy|my-macro>
The
<assign|overloaded-hi|
<macro|name|<\compound|
<if|<nice-weather>|happy-hi|sad-hi>
|
name
>
>>
3.3.Formatting primitives
This section contains some important notes on formatting primitives which are not really part of the style-sheet language, but nevertheless very related.
First of all, most TeXmacs presentation tags can be divided in two
main categories: inline tags and block tags. For instance,
<assign|my-theorem|<macro|body|<surround|<no-indent><with|font-series|bold|Theorem. >|<right-flush>|body>>>
In this example, we surrounded the body of the theorem with the bold text “Theorem.” at the left hand side and a “right-flush” at the right-hand side. Flushing to the right is important in order to make the blue visual border hints look nice when you are inside the environment.
In most cases, TeXmacs does a good job in determining which tags are
inline and which ones are not. However, you sometimes may wish to
force a tag to be a block environment. For instance, the tag
<assign|very-important|<macro|body|<with|font-series|bold|color|red|body>>>
may both be used as an inline tag and a block environment. When
placing your cursor just before the
<assign|very-important|<macro|body|<document|<with|font-series|bold|color|red|body>>>>
Since the body of the macro is now a block, your tag
Another important property of tags is whether they contain normal
textual content or tabular content. For instance, consider the
definition of the standard
<assign|eqnarray*|<macro|body|<with|par-mode|center|mode|math|math-display|true|par-sep|0.45fn|<surround|<no-page-break*><vspace*|0.5fn>|<vspace|0.5fn><no-indent*>|<tformat|<twith|table-hyphen|y>|<twith|table-width|1par>|<twith|table-min-cols|3>|<twith|table-max-cols|3>|<cwith|1|-1|1|1|cell-hpart|1>|<cwith|1|-1|-1|-1|cell-hpart|1>|body>>>>>
The use of
Finally, it is important to bear in mind that style-sheets do not
merely specify the final presentation of a document, but that they may
also contain information for the authoring phase. Above, we have
already mentioned the use of the
<assign|labeled-theorem|
<macro|id|body|<\surround|
<\concat|
<no-indent>
|
<flag|Id: id|blue|id>
|
<with|font-series|bold|Theorem. >
>
|
<right-flush>
|
body
>
>>
More generally, the
3.4.Evaluation control
The
<assign|new-theorem|<macro|name|text|<quasi|<assign|<unquote|name>|<macro|body|<surround|<no-indent><strong|<unquote|text>. >|<right-flush>|body>>>>>>
When calling <new-theorem|theorem|Theorem> in this example, we first evaluate all
<assign|theorem|<macro|body|<surround|<no-indent><strong|Theorem. >|<right-flush>|body>>>
Next, this expression is evaluated, thereby defining a macro
It should be noticed that the TeXmacs conventions for evaluation are
slightly different then those from conventional functional languages
like
For instance, when TeXmacs calls a macro <macro|x1||xn|body> with arguments y1 until
yn, the argument variables x1
until xn are bound to the
unevaluated expressions y1 until yn,
and the body is evaluated with these bindings. The evaluation of yi takes place each time we request for the
argument xi. In particular, when
applying the macro <macro|x|x and again x>
to an expression y, the expression y
is evaluated twice.
In
<assign|foo|<macro|x|<blah|x|x>>>
would correspond to a
(define-macro (foo x)
  ‘(let ((x (lambda () ,x)))
     (blah (x) (x)))
Conversely, the
(define-macro (foo x) (blah x x))
(define (fun x) (blah x x))
admit the following analogues in TeXmacs:
<document|<assign|foo|<macro|x|<eval|<blah|<quote-arg|x>|<quote-arg|x>>>>>>
<document|<assign|fun|<macro|x|<with|x*|x|<blah|<quote-value|x*>|<quote-value|x*>>>>>>
Here the primitives
3.5.Control flow
Besides sequences of instructions, which can be achieved using the
The most important primitive
<assign|appendix|
<macro|title|body|<document|<\compound|
<if|<long-document>|chapter-appendix|section-appendix>
|
title
|
body
>
>>>
In this example,
<assign|appendix|
<macro|title|body|<document|<\if|
<long-document>
|
<chapter-appendix|title|body>
|
<section-appendix|title|body>
>
>>>
The
<assign|hey|
<macro|first|second|<\if|
<equal|second|?>
|
Hey first, you look lonely today…
|
Hey first and second, you form a nice couple!
>
>>
However, TeXmacs is not clever enough to detect which arguments are
optional and which arguments are accessible (i.e. which
arguments can be edited by the user). Therefore, you will have to
manually give this information using the
3.6.Computational markup
In the menus
<assign|new-important|
<macro|name|<quasi|<\concat|
<\assign|
<unquote|name>
|
<macro|x|<with|font-series|bold|x>>
>
|
<\assign|
<unquote|<merge|name|-red>>
|
<macro|x|<with|font-series|bold|color|red|x>>
>
>
>>>
Here we use the
4.Customizing the standard TeXmacs styles
Whenever the standard TeXmacs style files are inadequate for a given purpose, it is possible to write your own style files. However, designing your own style files from scratch may be a complex task, so it is usually preferable to customize the existing styles. This requires some understanding of the global architecture of the standard style files and a more precise understanding of the parts you wish to customize. In this section, we will explain the general principles. For more details, we refer to the chapter on the principal TeXmacs tags.
4.1.Organization of style files and packages
Each standard TeXmacs style file or package is based on a potentially finite number of subpackages. From an abstract point of view, this organization may be represented by a labeled tree. For instance, the tree which corresponds to the article style is represented below:
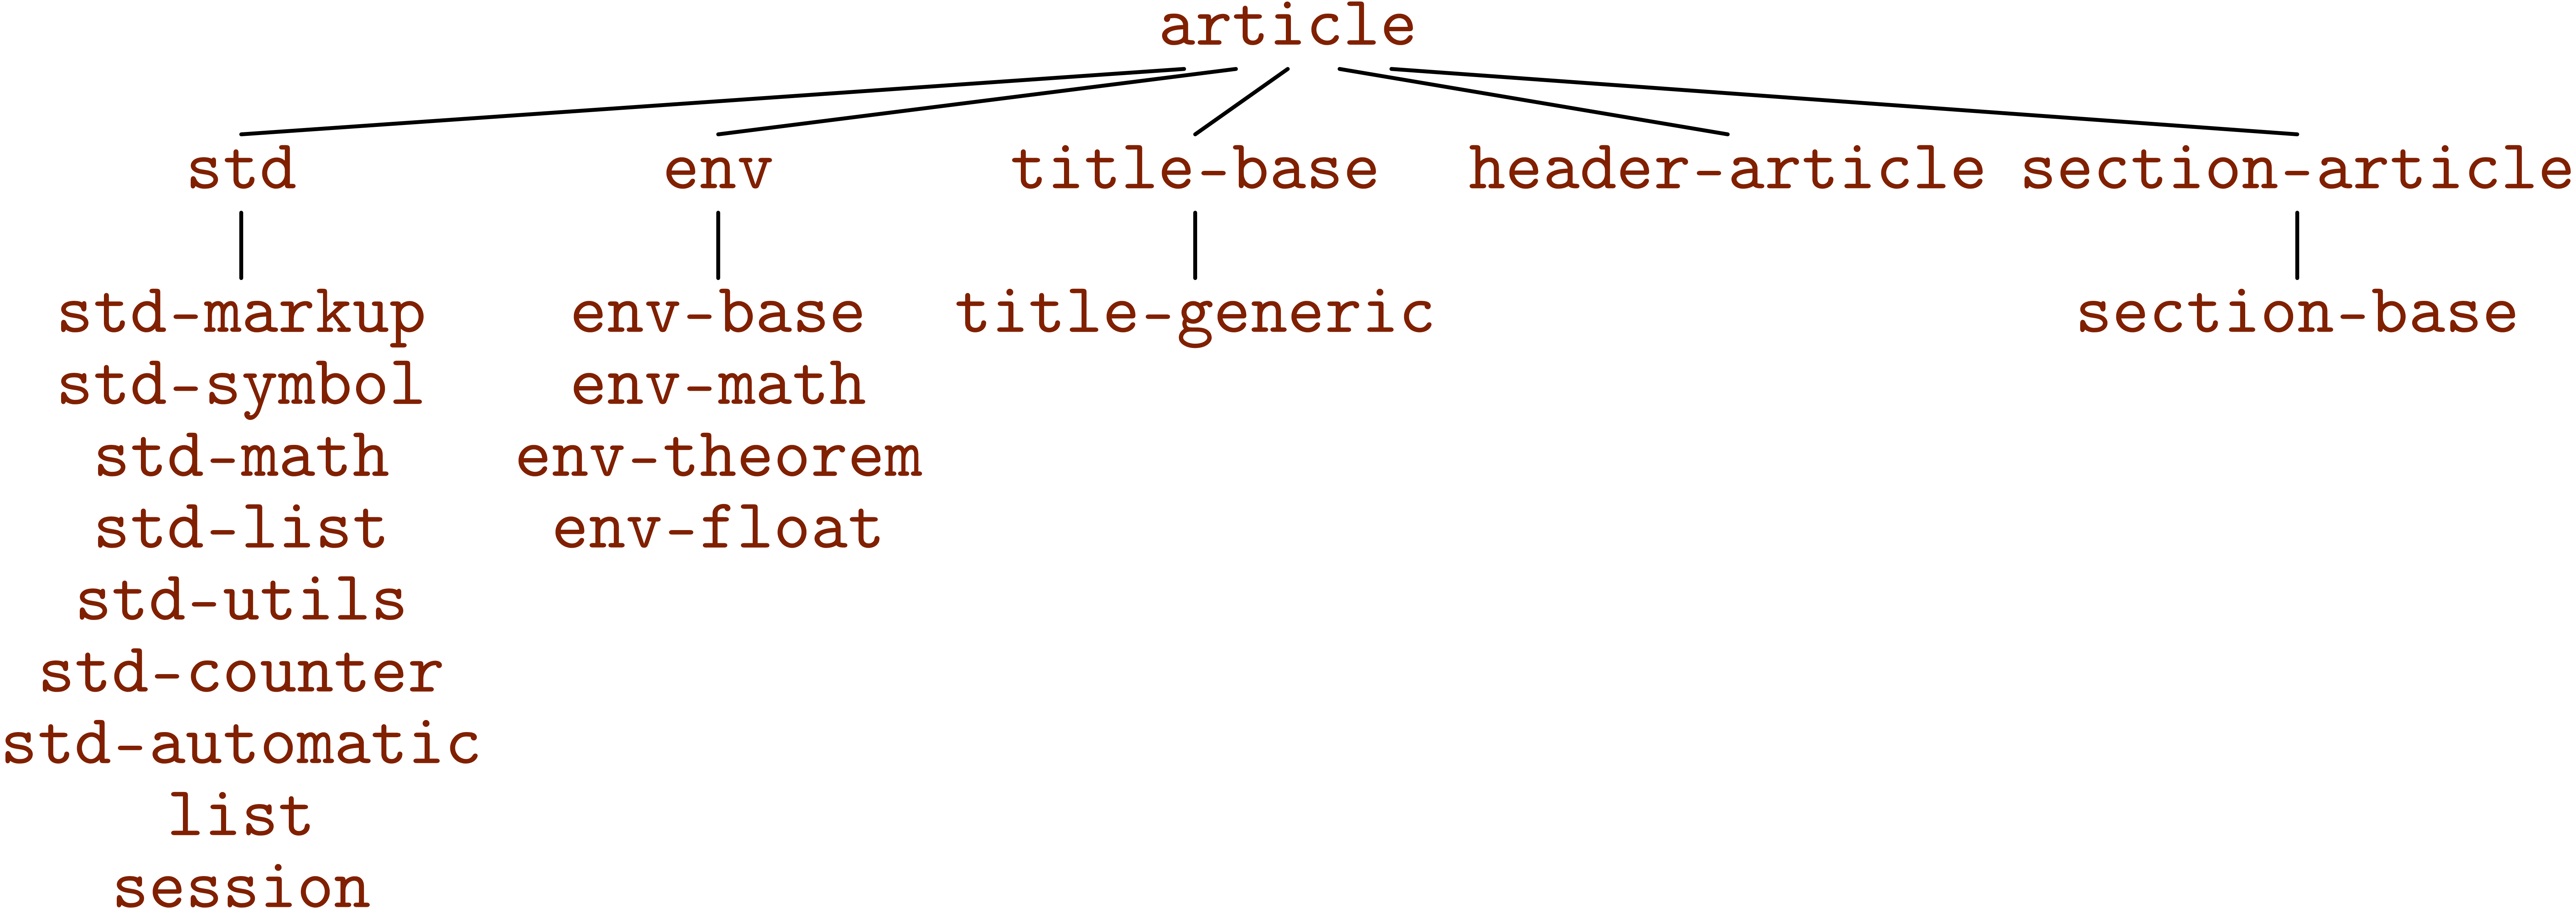 |
Most of the style packages correspond to a d.t.d. (data type definition) which contains the “abstract interface” of the package, i.e. the exported tags. For instance, the package std-markup corresponds to the d.t.d. std-markup. Sometimes however, several style packages match the same d.t.d.. For instance, both header-article and header-book match the d.t.d. header, since they merely implement different ways to render the same tags.
When building your own style files or packages, you may use the
<use-package|std|env|title-generic|header-article|section-article>
More precisely, the
    $TEXMACS_PATH/styles
    $TEXMACS_PATH/packages
When loading using ?, these paths are in the standard load path. For instance, if you want to take a look at the std-markup package, then it suffices to type ?, followed by the file name std-markup.ts and Return.
4.2.General principles for customization
Style files and packages basically enrich the current typesetting environment with a combination of
-
Environment variables.
-
Tags for the end-user.
-
Customizable macros.
Furthermore, they may define some tags for intern implementation
purposes, which will not be documented in this manual. They may also
specify some logical properties of tags using the
Environment variables are almost always attributes for controlling the
rendering of content, or counters for sections, equations,
etc.. Although several simple tags for the end-user like
4.3.Customizing the general layout
The general layout of a document is mainly modified by setting the appropriate environment variables for page layout and paragraph layout. For instance, by including the following lines in your style file, you can set the page size to letter and the left and right margins to 2in:
<document|<assign|page-type|letter>|<assign|page-odd|2in>|<assign|page-even|2in>|<assign|page-right|2in>>
It should be noticed that the environment variables for page layout are quite different in TeXmacs and TeX/LaTeX. In order to make it easier to adapt LaTeX style files to TeXmacs, we have therefore provided the std-latex package, which emulates the environment variables from TeX/LaTeX. Typically, this allows you determine the global layout by lines like
<document|<assign|tex-odd-side-margin|<macro|20pt>>|<assign|tex-even-side-margin|<macro|20pt>>|<assign|tex-text-width|<macro|33pc>>>
We notice that macros which return lengths are considered as lengths themselves. In the case of the TeX/LaTeX emulation package, we actually require all lengths to be macros.
The page headers and footers are usually not determined by global
environment variables or macros, since they may change when a new
chapter or section is started. Instead, TeXmacs provides the call-back
macros
<assign|header-primary|
<macro|title|nr|type|<assign|page-even-header|<quasiquote|<\wide-std-underlined|
<\concat|
<page-the-page>
|
<htab|5mm>
|
<unquote|title>
>
>
>>>>
4.4.Customizing list environments
Lists are made up of two principal ingredients: the outer list environment and the inner items. List environments may either be customized by customizing or redefining the rendering macros for these environments, or defining additional list environments which match the same abstract interface.
The rendering of the outer list environment is controlled by the
<assign|render-list|
<macro|body|<\surround|
<no-page-break*><vspace*|0.5fn>
|
<right-flush><vspace|0.5fn><no-indent*>
|
<with|par-left|<plus|par-left|3fn>|par-right|<plus|par-right|3fn>|body>
>
>>
This redefinition affects the rendering of all list environments (itemize, enumerate, etc.) by reducing the right margin with a length of 3fn:
-
This text, which has been made so long that it does not fit on a single line, is indented on the right hand side by 3fn.
-
This text is indented by an additional 3fn on the right hand side, since it occurs inside a second list environment.
-
-
Once again: this text, which has been made so long that it does not fit on a single line, is indented on the right hand side by 3fn.
In a similar way, you may customize the rendering of list items by
redefining the macros
<assign|aligned-item|
<macro|x|<\concat|
<vspace*|0.5fn>
|
<with|par-first|-3fn|<yes-indent>>
|
<resize|<with|color|red|x>|<minus|1r|2.5fn>||<plus|1r|0.5fn>|>
>
>>
Then items inside all list environments with compact items will appear in red:
-
This list and aligned descriptions have red items.
- C1
-
First condition.
- C2
-
Second condition.
-
The items of compact description lists are rendered using
compact-item .- Gnus and gnats
-
Nice beasts.
- Micros and softies
-
Evil beings.
The std-list
d.t.d. also provides a macro
<document|<new-list|enumerate-roman|aligned-dot-item|<macro|x|<number|x|roman>>>>
4.5.Customizing numbered textual environments
TeXmacs provides three standard types of numbered textual environments: theorem-like environments, remark-like environments and exercise-like environments. The following aspects of these environments can be easily customized:
-
Adding new environments.
-
Modifying the rendering of the environments.
-
Numbering the theorems in a different way.
Defining new environments
First of all, new environments can be added using the meta-macros
<new-theorem|experiment|Experiment>
When available in the TeXmacs dictionaries, the text “Experiment” will be automatically translated when your document is written in a foreign language. In the section about how to define new environments, it is also explained how to define other numbered textual environments (besides theorems, remarks and exercises).
Customization of the rendering
The principal rendering of the environments can be customized by
redefining the
<assign|render-theorem|<macro|which|body|<document|<padded-normal|1fn|1fn|<surround|<theorem-name|which<theorem-sep>>||<with|font-shape|slanted|par-left|<plus|par-left|1.5fn>|body>>>>>>
This redefinition produces the following effect:
This is a theorem which has been typeset in a slanted font.
By default, the theorems are rendered as remarks with the only
difference that their bodies are typeset in an italic font. Hence,
redefining the
Instead of redefining the entire rendering, the user might just wish
to customize the way names of theorems are rendered or redefine the
separator between the name and the body. As the user may have noticed
by examining the above redefinition of
<assign|theorem-name|<macro|name|<with|color|dark red|font-series|bold|name>>>
<assign|theorem-sep|<macro|: >>
Then theorem-like environments will be rendered as follows:
Proposition
Customization of the numbering
In the sections about counters and counter groups, it is
explained how to customize the counters of numbered environments for
particular purposes. For instance, by redefining
<\quasi|
<\assign|
inc-theorem
|
<macro|<compound|<unquote|inc-theorem>><reset-corollary>>
>
>
Notice the trick with
The following code from number-long-article.ts is used in order to prefix all standard environments with the number of the current section:
<assign|section-clean|<macro|<reset-subsection><reset-std-env>>>
<assign|display-std-env|<macro|nr|<section-prefix>nr>>
4.6.Customizing sectional tags
By default, TeXmacs provides the standard sectional tags from LaTeX
From a global point of view, an important predicate macro is
The rendering of a sectional tag
<assign|sectional-sep|<macro| – >>
sectional titles would typically look like
1 – Hairy GNUs
The
<assign|subsection-numbered-title|
<macro|name|<\sectional-normal|
<with|font-series|bold|<the-subsection>. >name
>
>>
This has the following effect on the rendering of subsection titles:
2.3. Very hairy GNUs
Notice that the section-base
package provides several useful helper macros like
My paragraph
All other sectional tags use the long rendering, in which case the section title takes a separate line on its own:
My section
Blah, blah, and more blahs…
We do not recommend to modify the standard settings (i.e. to render paragraphs in a long way or sections in a short way). If you really want to do so, then we recommend to redefine the corresponding environment variables enrich-x-long. This will ensure upward compatibility when sectional tags will take an additional argument (see remark ?).
Besides their rendering, several other aspects of sectional tags can be customized:
-
The call-back macro
x-clean can be used for cleaning some counters when a new section is started. For instance, in order to prefix all standard environments by the section counter, you may use the following lines:<document|<assign|section-clean|<macro|<reset-subsection><reset-std-env>>>|<assign|display-std-env|<macro|nr|<section-prefix>nr>>>
-
The call-back macro
x-header should be used in order to modify page headers and footers when a new section is started. Typically, this macro should callheader-primary , orheader-secondary , or do nothing. -
The call-back macro
x-toc should be used in order to customize the way new sections appear in the table of contents.
4.7.Customizing the treatment of title information
TeXmacs uses the
Each child of the
Most of the tags listed above also correspond to macros for rendering
the corresponding information as part of the main title. For instance,
if the date should appear in bold italic at a distance of at least 1fn from the other title fields, then you may redefine
<document|
<assign|doc-date|<macro|body|<\concat|
<vspace*|1fn>
|
<doc-title-block|<with|font-shape|italic|font-series|bold|body>>
|
<vspace|1fn>
>
>>>
The
Notice also that the
In addition to the rendering macros which are present in the document,
the main title (including author information, the date,
etc.) is rendered using the
The first stage of processing the document data is more complex and the reader is invited to take a look at the short descriptions of the macros which are involved in this process. It is also good to study the definitions of these macros in the package itself. In order to indicate the way things work, we finish with an example on how the email address and homepage of an author can be rendered in a footnote instead of the main title:
<document|<assign|doc-author-main|<macro|data|<document|<quasi|<document|<unquote*|<select|<quote-arg|data>|author-name>>|<unquote*|<select|<quote-arg|data>|author-affiliation>>>>>>>|<assign|doc-author-data-note|<xmacro|data|<quasi|<document|<unquote*|<select|<quote-arg|data>|author-email>>|<unquote*|<select|<quote-arg|data>|author-homepage>>|<unquote*|<select|<quote-arg|data>|author-note|document|<pat-any>>>>>>>>
5.Further notes and tips
5.1.Customizing arbitrary tags
Imagine that you want to change the rendering of a given tag, like
However, in some cases, it may not be clear which
“well-chosen” macro to customize. If we just wanted to
change the presentation of lemmas and not of any other theorem-like
environments, then we clearly cannot modify
So imagine that you want all lemmas to appear in red. One thing you can always do is copy the original definition of lemmas in a safe place and redefine the lemma macro on top of the original definition:
<document|<assign|orig-lemma|lemma>|<assign|lemma|<macro|body|<with|color|red|<orig-lemma|body>>>>>
Alternatively, if only the text inside the lemma should be rendered in red, then you may do:
<document|<assign|orig-lemma|lemma>|<assign|lemma|<macro|body|<orig-lemma|<with|color|red|body>>>>>
Of course, you have to be careful that the name
Another frequent situation is that you only want to modify the
rendering of a tag when it is used inside another one. On the web, the
Cascading Style Sheet language (CSS)
provides a mechanism for doing this. In TeXmacs, you may simulate this
behaviour by redefining macros inside a
<document|<assign|orig-render-theorem|render-theorem>|
<assign|render-theorem|<macro|name|body|<with|orig-render-list|render-list|<with|render-list|<macro|x|<orig-render-list|x>>|<\orig-render-theorem|
name
|
body
>
>>>>>
On the one hand side, this mechanism is a bit more complex than
CSS, where it suffices to respecify the par-par-sep attribute of lists inside theorems.
On the other hand, it is also more powerful, since the
5.2.Standard utilities
In the package std-utils, the user may find several useful additional macros for writing style files. It mainly contains macros for
-
Writing block environments which span over the entire paragraph width. Notice that the title-base package provides some additional macros for wide section titles.
-
Writing wide block environments which are underlined, overlined or in a frame box.
-
Recursive indentation.
-
Setting page headers and footers.
-
Localization of text.
It is good practice to use these standard macros whenever possible when writing style files. Indeed, the low-level TeXmacs internals may be subject to minor changes. When building upon standard macros with a clear intention, you increase the upward compatibility of your style-sheets.